Freestyle refresher course Part 2: body position, action and reaction
Register to get 3 free articles
Want unlimited access? View Plans
Already have an account? Sign in
Improve your body position in the water, and understand how your body responds to various actions
In Part 1, we looked at how to improve your breathing in front crawl. This time, we’re thinking about your body position in the water, and how your body responds to various actions.
As with the breathing exercises, our process has three steps: know what you’re aiming for, understand what you are doing now, and then make the necessary changes.
How to improve your body position in the water
Straight and narrow
So what does good body position look like – and, more importantly, what does it feel like? I suggest watching good distance swimmers in action. For example, check out Lucy Charles-Barclay’s domineering swim in the first leg of the 2023 Ironman World Championships in Kona (you can find footage on YouTube). Here are some things you should notice when you watch strong swimmers (although you are likely to spot exceptions too).
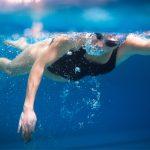
Overall, the full length of the body is almost horizontal, just below the surface of the water. The shoulders break the surface alternatively, with each stroke. The hips are almost touching the surface, the legs are mostly straight and the heels touch or break the surface with each kick. Watching from above, you don’t want to see too much wiggle, nor do you want legs flying out to the side. They should be close together and in line with the torso. The body and legs are, as far as possible, straight and narrow.
It’s one thing to know what good position looks like but, as you can’t see your own body while you swim, how do you feel it?
As your chest is the most buoyant part of your body, because of your lungs, your upper body will almost certainly be close to the surface. You shouldn’t need to worry about it. It’s hips and legs that normally sink. As you’re swimming normally, try to sense what your body is doing. Does it feel horizontal and
comfortably supported by the water or do you feel as if you’re swimming uphill? Can you detect if your heels touch the water surface? Do you feel as if your legs stay close to each other, perhaps brushing against each other? Do they feel light or are they dragging you down? Do your big toes tap against each other?
Also, for a bit of fun, try to do a somersault as you’re swimming (check first to make sure you don’t crash into anyone). How easily can you flip your legs out of the water and over your head? If it’s difficult, what does this suggest to you about their original position?
Finally, try swimming with a pull-buoy, in buoyancy shorts or in a wetsuit. Any of these will lift your lower body. Try to capture how this feels and notice the difference to normal swimming. If you swim faster with a pull-buoy it’s likely that your body position could be improved.
Making changes
Actively changing your body position is hard. You can’t, for example, simply lift your hips closer to the surface. Most problems with body position result from weaknesses in other parts of
your stroke. Sinky legs are not caused by having too much muscle, as some triathletes would have you believe.
Instead, you have to tackle the root causes – some of which we’ll address below while others we’ll look at in more detail in future parts of this series.
Be patient
Improving your body position takes time. An effective, streamlined body position is the result of lots of factors. If you focus on these, your body position will improve over time. Initially, prioritise head position
and breathing before moving on to refinements to your catch and pull. Work on one point at a time rather than trying to fix everything immediately. Tune in to your body position and notice how you
feel in the water. Stretch out and let the water buoy you up and take the strain. Don’t fight for good position. Sense it, and let it come to you.
A nice exercise to try for feeling your body position is the torpedo drill. Swim face down with your arms by your side, propelling yourself gently with your legs and feet. To breathe, rotate your body to about 45 degrees and turn your head just enough to get air. Return to face down and then breathe on the other side. Once you’re comfortable swimming like this, try pressing down with your chest and notice how buoyant it is when filled with air. Also, notice what happens to your legs. If you lift your head to breathe, they will sink, but when you press down with your chest, they will come closer to the surface.
One final point: we didn’t talk about kick. That’s because you don’t need a strong kick to achieve a good body position or keep your legs up. We’ll look at kicking in a future article. For now, remember that kicking harder is not the route to improving body position.

In Part 3: optimising your arms in front crawl
Simon Griffiths
I started Outdoor Swimmer in 2011 (initially as H2Open Magazine) as an outlet for my passion for swimming outdoors. I've been a swimmer and outdoor swimmer for as long as I remember. Swimming has made a huge difference to my life and I want to share its joys and benefits with as many people as possible. I am also the author of Swim Wild & Free: A Practical Guide to Swimming Outdoors 365 a Year, I provide one-to-one support to swimmers through Swim Mentoring and I'm the creator of the Renaissance Swimmer project.